
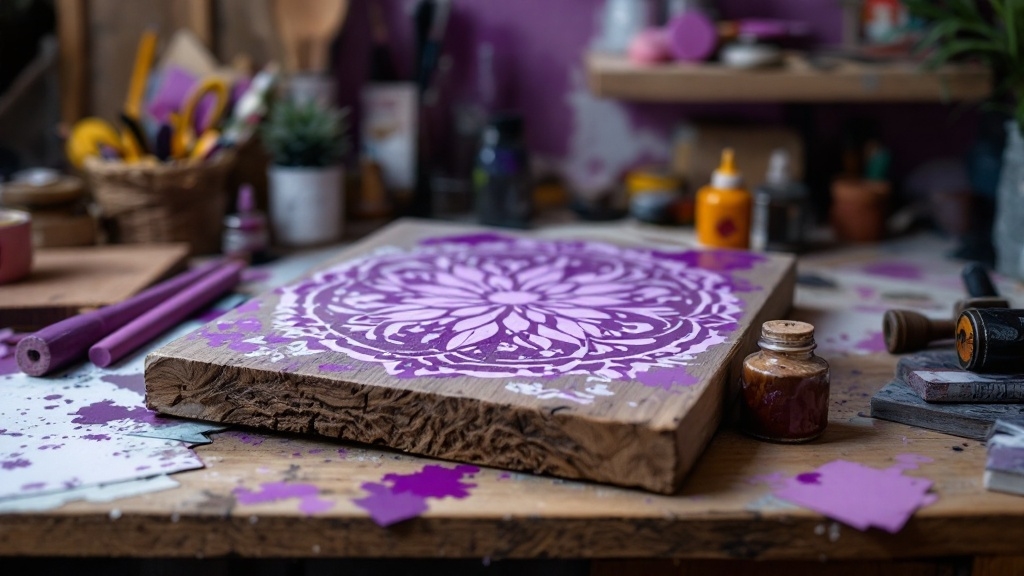
How To Do A Stencil On Wood
As I stood in my workshop, surrounded by the rich scent of wood and the soft glow of a single light bulb, I felt the urge to create something beautiful. Stenciling on wood has a way of transforming simple surfaces into captivating works of art. Let me guide you through this fulfilling journey of stenciling, so you can join me in making your own wood masterpiece.
Preparing The Wood Surface
Sanding And Smoothing
Before diving into the artistic part, it's essential to prepare your canvas. I always start with sanding. Selecting 150 grit sandpaper, I smooth out the surface, erasing any rough spots or deep grain marks that tell a story of their own. The gentle rasp of the sandpaper against the wood is soothing. This step isn't just about looks; it helps the stencil adhere better, preventing any unwanted paint bleeding under the edges.
Using Wood Filler
For particularly stubborn areas, a dab of wood filler comes into play. I spread it over the rough patches, turning the surface into a smooth expanse where the paint can land without hesitation. This little detail makes a significant difference in achieving that crisp look you desire.
Creating And Applying The Stencil
Cutting The Stencil
Next comes the stencil itself. If you have a cutting machine like a Cricut Maker or Silhouette Studio, consider yourself lucky! But don't fret if you don't; hand-cutting works too. The process fills me with anticipation as the design slowly takes shape.
Weeding The Stencil
Once cut, I weed out the negative space, leaving behind only the parts I want to be filled with paint. A moment of careful precision—this is where the magic starts. I use transfer tape, centering the stencil perfectly on the wood, ensuring even margins. Measuring is not just a chore; it’s an essential part of the craft.
Securing The Stencil
With the stencil in place, I press down firmly, feeling the grip of the vinyl against the wood. I grab a hard piece of plastic, burnishing the edges, securing every corner. No paint is going underneath this stencil—my project deserves that level of devotion.
Painting Techniques
Dry Brush Technique
The moment of truth arrives: painting. I dip my brush, carefully loading it and brushing off the excess on a palette. Using the dry brush technique, I lightly dab at the stencil, taking my time. It’s a delicate dance, allowing the paint to gently kiss the wood, reducing the chances of bleeding.
Stippling Technique
Sometimes, the stippling technique is called for instead—dabbing the brush instead of stroking. This method offers clean lines and a textured finish that feels almost alive. Each dot is a whisper of creativity.
Using Mod Podge
To ensure that our art remains untouched, I apply a thin layer of Mod Podge. As it dries clear, it creates an invisible barrier between the stencil and the paint. I let it sit, the clock ticking, or sometimes I use a hair dryer, eager to move on in the process.
Painting And Removing The Stencil
Choosing The Right Paint
The paint itself tells a story. I prefer acrylic paint, chalk paint, or latex paint—each has its personality. For this project, Rustoleum Chalked Paint offers a creamy texture that's hard to resist.
Painting
With my brush loaded just right, I return to the canvas. Oh, the thrill! I light dot the area, careful to avoid heavy strokes. “Less is best,” I remind myself, focusing on precision.
Removing The Stencil
After what seems like an eternity, the paint dries, and it’s time for the big reveal. I peel away the stencil, and if there’s any bleeding, a small brush can easily touch it up. The moment when I see the design I envisioned brings joy, satisfaction, and pride.
Additional Tips
Practice Stenciling
If you’re new to stenciling, don’t hesitate to practice. I always try out smaller areas first, gaining confidence before tackling the main project.
Using Stencil Adhesive
For reusable stencils, applying a light coat of spray adhesive can make a world of difference. It keeps everything in place without damaging your precious wood surface.
Key Takeaways
As you embark on your stenciling journey, remember these essential steps:
- Prepare the wood surface: Sand and use wood filler if necessary.
- Cut and weed: Create your stencil with care.
- Apply the stencil: Use transfer tape and ensure it’s centered.
- Use painting techniques: Dry brush or stippling to prevent bleeding.
- Apply Mod Podge: Protect the edges for sharper lines.
- Choose the right paint: Make sure it fits your project.
- Practice: Familiarize yourself with the technique.
- Use adhesive: For keeping your stencil secure.
With each stroke, your creativity unfolds, and your stencil becomes more than just an image; it becomes a part of who you are. Unleash your imagination and create your own beautiful wood designs. For inspiration or to find the perfect stencils, check out home decor stencils, where creativity meets possibility.
So grab your brush and let’s dive into the world of stenciling—where every creation whispers a story waiting to be told.